Thursday 8 May 2008

And Finally ( Round up Part 2)

[fig 15]
Look at the image above. Yes Sir! We seem to be getting there, or at least coming to the end of this modelling session. I cant wait to move on to the next one. I promise to go into more detail as my skills improve, or as I learn a faster way of doing things. Please feel free to leave your comments about this blog, be they positive or negative, as it would help me improve on techniques, and also the quality of the tutes.
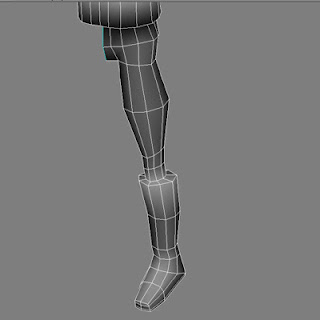
We have been able to attach the aliens head onto the torso. I made some final adjustments to the diameter of the upper right limb. The characters pose at this stage is neutral. most 3d characters modelled are in this neutral pose when finished as it is the most hassle free pose for a model to adopt during the construction phase.
However it may be good practice to learn how to model with the prospect of animation in mind, and try to make some of the models joints closer to the position that they would assume during the cycle of animation. This in addition to placing the edges properly makes sure very little unwanted deformation takes place.


[fig 16]
In [fig 16] above, the model is about to be uv mapped. uv mapping is a step you have to go through before you can texture your model. Basically a texture is a set of square (2 dimensional) coordinates sort of stretched around the surface of your 3 dimensional model.
The red edges marked out show where I would want the programme to do the splitting
There are certain rules you should apply here in texture mapping a character.
  1. Small areas like the extremities should take up a lot of space on the map for any appreciable detail to be able to register.
  2. Go to town with allocating space to the head and face as well. Human beings instinctively look at an object that represents a face, be it a sculpted statue, a drawing, or a 3d model. By detailing the face properly, it would make the model stand out.
  3. Try not to waste space if you can. Wasted space is represented by the areas not covered in the map.


[fig 17]

The [fig 17] shows the splitted uvs, which were split according to the red lines I selected. To me this looks like about 80% utilisation of texture space, which isn't all that bad. Hey maybe I should try to write a script to be able to compute the percentage utilisation, that would be nice and mighty useful.

Finally the images below show how the fully textured character looks. It took me about 2 days to completely model and texture him, under normal circumstances, I can work much faster, but I was distracted on other projects during the modeling and making of this tutorial.

[fig 18]


[fig 19

[fig 20]


[fig 21]


Tuesday 6 May 2008

The Process (Round up Part 1)

[fig 11]
In the above diagram, both the lower limbs are in place. We did duplicate the left leg as we said. The entire model is asymmetrical in nature, thus we had to do things in phases. Remember that this 3d model is really just a basic one, and as our experience grows, we would be able to move on to even more complex geometric shapes.
We are now going to focus on the head.


[fig 12]
The head we want should have certain features. Although you cant see it from the 2d drawings [fig 1 & 2], the back of the head is actually elevated. ( I did not supply a side shot, which would have shown it ). We have revealed the hidden head which was there all along, and started some modifications. The back of the head is elevated above the rest of the skull, thus it is lifted. The aliens nose is lifted as well. This model is not going to have any moving mouth parts, and also, the eyes would be stationary. All of the fine facial detail would be applied using the texture when we get to that stage.


[fig 13]

In the picture above, the nose is flattened, we tried to use the limited polygons we have to mould the general shape of the head. I mentioned that the features would be painted on, but I also want to point out that in a 3d real time model, there should be no holes in the geometry. This I believe would cause problems during the real time rendering or compilation.


[fig 14]
So here we have the finished modelled alien head. You have to join this to the main torso, so it's important that the number of vertices around the rim of the lower part of the neck matches that on the torso. Also try not to create an extra line of unneeded polygons around the neck when joining together.
In the next post, Ill talk a little bit about laying the uvs, and texturing our game character.


The Process ( Shaping Part 2)

[fig 7]
So now we can make a bit more progress. In the diagram above, the deleted template upper limb is reformed into our metallic mechanical left 'arm' of our character. It is a cylindrical contraption. I do like the process of modelling mechanical objects because the modelling is precise in nature. There's a lot of edge division, selection and extrusion of polygons. Bevelling or chamfering are features as well. Above, we selected the open edges of the hole created by the deletion, and duplicated them, before extrusion sideways. We made sure the cross section of the edges was as round as possible before doing any of this. (this was achieved by adjusting vertices from a side view)


[fig 8]
In [fig 8] above, all of the polygons of the right leg have been selected. Our aim here is to delete them, then completely reform the characteristic emaciated type legs that our alien sports in [fig 1 & 2], from the remaining undeleted left leg. Once this is done. we would then proceed to select and duplicate/mirror the left leg to form a right limb.


[fig 9]
Remember all the general modelling principles you have to apply whilst modelling movable or animatable parts of a real time 3d character. Some of these are:

  • Always keep the highest density of geometry clustered around the actual parts of the model that undergo deformation.
  • The edges of the geometry that surround these areas must be angulated in such a way that even with a fair amount of deformation, the shape or topology would be maintained or preserved to a reasonable extent.


[fig 10]

In the picture above, the lower limb has started to take shape. Some polygons were selected and scaled down around the knee area, whilst a boot was shaped. Take a closer look at the foot in [fig 10], and compare it to that in [fig 9], you would see that it has a fewer number of faces/ polygons. We had to look for areas where we could reduce the polygon count to compensate for the polygons created by forming the demarcation between the knee and the boot. When actively modelling any real time 3d object, your brain is constantly trying to work around issues relating to polygon count form and function. If you decided to switch to modelling characters that were intended for a short movie or some pre-rendered animation, then its a whole different ball game, as you would not be restricted by normal real time quotas.

The real time 3d modelling principles and skills I describe here could take some time to perfect. It is an art in itself, and the true art will be revealed in my forthcoming e-book about character design which I would be announcing on this blog to all my readers in the future.