
Hello everyone, just to say Ive taken quite a while of from blogging, to sort out work with the guys at meshmine . As soon as I come back ill try to get some images, (with the sites owners permission) to post on my blog. For the meantime, you can visit (for free stuff and also some pretty good 3d models) , http://meshmine.com/default.aspx
I had a poor response to the 3d challenge I set up last time, and as a result I strayed ( more like an unfaithful pet) to work elsewhere. I am still dedicated you know, eh.
Keep the comments comming guys!
Thursday 2 October 2008
Monday 9 June 2008
3d Character Challenge: ITS ON!!!!
Ive always believed that sometimes in life, you've got to set a few challenges for yourself to liven things up a bit. Also, its necessary to aid the learning process, and hinder things like apathy,and lethargy. The modeling business can be a thrill, but only if you have s fixed agenda. I want all my readers to have a good experience when visiting my blogs, and not to go away empty handed.
You are the reason I blog today, and I was introduced to this blog sphere, by a fellow blogger. Because of these factors mentioned above, I have decided to set up a challenge for myself, and anyone I take on board my team, of modeling out 2d submissions from readers. You can get these submissions to me by placing a link on a comment you make about the posts.
The challenge outlines for this blog are as follows.
(1) You should submit a 2d drawing of a game character to be modeled.
(2) Characters should be:
(a) Alien , human, or humanoid (b) armoured, or none armoured, but clothed
(c) not copied from another persons work, all art work should be yours, and by submitting , you would be giving permission to freely use the work for the purposes for which this challenge are intended. (a quick 4 minuet sketch during your lunch break may do the trick)
(d) Accessories would not be modeled, only weapons fused to the game character
(e) Textured drawings may be modeled on preference to non textured ones. If you submit a black and white sketch try indicating with arrows, the colors of textures you want on the model.
(f) All modeled characters accepted and modeled will be available for free download by the readers of this blog ( for use in personal projects only).
(g) The modeling process would not be shown on the blog because of image storage space, just your 2d image, and a render of the final model, with a link to its download, or a provision to supply you, via e-mail the completed model. (how cool is that folks?)
More terms and conditions would be posted as the challenges progress. So what are you waiting for? The doors are open, and we are awaiting the first task.
Thursday 8 May 2008
And Finally ( Round up Part 2)
 [fig 15]
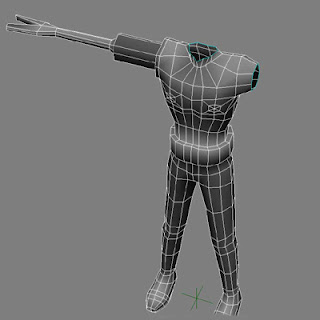
We have been able to attach the aliens head onto the torso. I made some final adjustments to the diameter of the upper right limb. The characters pose at this stage is neutral. most 3d characters modelled are in this neutral pose when finished as it is the most hassle free pose for a model to adopt during the construction phase.
However it may be good practice to learn how to model with the prospect of animation in mind, and try to make some of the models joints closer to the position that they would assume during the cycle of animation. This in addition to placing the edges properly makes sure very little unwanted deformation takes place.
 [fig 16]
The red edges marked out show where I would want the programme to do the splitting
There are certain rules you should apply here in texture mapping a character.
- Small areas like the extremities should take up a lot of space on the map for any appreciable detail to be able to register.
- Go to town with allocating space to the head and face as well. Human beings instinctively look at an object that represents a face, be it a sculpted statue, a drawing, or a 3d model. By detailing the face properly, it would make the model stand out.
- Try not to waste space if you can. Wasted space is represented by the areas not covered in the map.
 [fig 17]
The [fig 17] shows the splitted uvs, which were split according to the red lines I selected. To me this looks like about 80% utilisation of texture space, which isn't all that bad. Hey maybe I should try to write a script to be able to compute the percentage utilisation, that would be nice and mighty useful.
Finally the images below show how the fully textured character looks. It took me about 2 days to completely model and texture him, under normal circumstances, I can work much faster, but I was distracted on other projects during the modeling and making of this tutorial.
 [fig 18]
 [fig 19
 [fig 20]
 [fig 21]
Tuesday 6 May 2008
The Process (Round up Part 1)
 [fig 11]
We are now going to focus on the head.
 [fig 12]
 [fig 13]
In the picture above, the nose is flattened, we tried to use the limited polygons we have to mould the general shape of the head. I mentioned that the features would be painted on, but I also want to point out that in a 3d real time model, there should be no holes in the geometry. This I believe would cause problems during the real time rendering or compilation.
 [fig 14]
So here we have the finished modelled alien head. You have to join this to the main torso, so it's important that the number of vertices around the rim of the lower part of the neck matches that on the torso. Also try not to create an extra line of unneeded polygons around the neck when joining together.
In the next post, Ill talk a little bit about laying the uvs, and texturing our game character.
The Process ( Shaping Part 2)
 [fig 7]
 [fig 8]
 [fig 9]
Remember all the general modelling principles you have to apply whilst modelling movable or animatable parts of a real time 3d character. Some of these are:
- Always keep the highest density of geometry clustered around the actual parts of the model that undergo deformation.
- The edges of the geometry that surround these areas must be angulated in such a way that even with a fair amount of deformation, the shape or topology would be maintained or preserved to a reasonable extent.
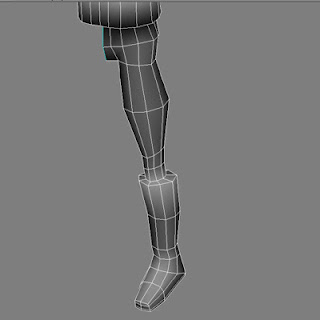
[fig 10]
In the picture above, the lower limb has started to take shape. Some polygons were selected and scaled down around the knee area, whilst a boot was shaped. Take a closer look at the foot in [fig 10], and compare it to that in [fig 9], you would see that it has a fewer number of faces/ polygons. We had to look for areas where we could reduce the polygon count to compensate for the polygons created by forming the demarcation between the knee and the boot. When actively modelling any real time 3d object, your brain is constantly trying to work around issues relating to polygon count form and function. If you decided to switch to modelling characters that were intended for a short movie or some pre-rendered animation, then its a whole different ball game, as you would not be restricted by normal real time quotas.
The real time 3d modelling principles and skills I describe here could take some time to perfect. It is an art in itself, and the true art will be revealed in my forthcoming e-book about character design which I would be announcing on this blog to all my readers in the future.
Sunday 27 April 2008
The Process (Shaping Part 1)

[fig 3]
Now look at the image above, it shows the modeling process in action. What is happening is I'm trying to shape the character from an existing template of a basic man which comes with the software application I use. Ive removed the head from the scene by selecting extracting, and hiding it. The right arm of the character in the above figure, is already in progress. It is a mechanical, metallic looking contraption, with a pincer-like distal extremity. [fig 4]
[fig 5]
In the picture above, the polygons around the waist line were selected, and extruded. Since the belt of the character is a prominent aspect of his look, that had to be modelled hat least half of the way, rather than to rely solely on texture painting. The polygons were also scaled down in the vertical direction. (The red areas show the selected polygons)
The reason why I scaled them down like this is that if the character is looked at head on, you would loose the sense of depth for the belt if all the polygons were the same height.

[fig 6]
The shaping of our character continues. Here, the left humanoid arm was selected and deleted. We are designing an alien entity here, actually not just an alien entity, but a mean alien entity. The left 'arm' has a laser firing weapon of some sort. Its a cylindrical structure with a fair amount of surface detail. Again, we would not be modelling every aspect of the mechanical arm, just the gross details. The texturing would be used to fill in everything.
I'm going to step things up with this tutorial and post at a faster rate until its finished so that we can move on to the next modeling project. As the time goes by, the tutorials will be written with more detail.
Friday 25 April 2008
The drawings
Starting out any modelling project would normally begin with getting a pencil and paper out to draw the idea down. I'm going to break the tutorial down until I sort out the image storage space issues and options here for me in this blog. Here is the simple character I drew earlier on.
 [fig 2] An alien entity with body armour, and metallic pincer like appendages, amongst other things. I'm going to begin with the body. Usually, for symmetrically aligned 3d images or models, the modeller models only one half. When that half has been completed, he or she would proceed to copy or mirror that half, to form the other side of the model. Mirroring creates a laterally inverted representation of the first half.
 [fig 1]
The picture is small, but just big enough to outline what we should be aiming at, a simple 3d low polygon character for use in a computer game. This next update to the drawing shows the colour concept we have in mind when we get to the texturing phase.
 [fig 2]
 You know what? I'm going to cut out the fancy language in this tutorial, and stick to simple effective English. Lateral inversion just means your left becomes right, and your right becomes left, just the same as when you look into a mirror.
Ill stop here now to sort out some issues that need configuring on my blog, it seems I don't really need to break up my tutorials into little pieces. I have a lot of images as well, and I need to make sure that I don't run out of storage space.
Before I go, I'd just drop a few points when it comes to character creation. There are many approaches to the topic, you can get inspiration from many sources around you. All it takes really is for you to stretch the boundaries of your imagination. When I started this blog, I titled it 2 worlds because apart from the real world we see around us, I do spend quite a lot of time in cyberspace these days, which although is vast, in the true sense of the word, in comparison to the unknowns of distant galaxies and the cosmos, it is actually insignificant in its size. It is a form of escapism, I cant help but picture the ostrich which seeks refuge by hiding its head underground when threatened.
Talking about stretching your imagination, we all talk and speculate about the possibility of intelligent life existing somewhere in the universe. We've all been enthralled by alien species in films and things of the sort. The question I want to ask is if they do exist somewhere out there, whats the guarantee that they would assume the same shape and humanoid form that we ourselves were created in? My immediate answer is there's no guarantee. The only time that I would say with 100% conviction that that would be the case is if they originated from a planetoid body with features almost Identical to the mother earth we know.
By imagining inhabited planets with features drastically different from earth, you would be on the first step towards the conceptualisation of your unique character. Larger gravity would equate to larger mesomorphic entities. A planet with a harsh atmosphere, possibly with circulating poisonous gases would dramatically alter the breathing apparatus of any alien species from the ones we know. That's just to provide some food for thought, I'll stop typing here now.
Tuesday 22 April 2008
Concept
Okay, its been a while since I last posted, the idea Is to put my thoughts down as often as possible, but of lately Ive seen myself occupied with other things. I am fully committed to this blog as you will find out as time goes by.
So how do we start the process of modeling a 3d object. Firstly we have to form a concept of what were aiming to achieve on the long run, on a piece of paper, or on a blank canvas using a 2d paint program such as the gimp for example. Over the years I have been trying to perfect the art of molding out a true representation of any thing I sketched in 2d. I soon found out that virtually any thing can be forged, the only limiting factors are ones imagination, and the polygon count of the model in question.
See below a rough image of a 3d game character I thought of and sketched this evening.
 As you see, hes a character with a fair amount of complexity, and detail. This 2d image is going to be our template, or tracing image to work on. If you read a 3d car modeling tute, you'd agree that a lot of reliance is placed on the cars blueprints, which the 3d modeler uses to sort of shape the car. The same principle can also be applied to humanoid modeling, but there are certain disadvantages about doing so. Some of these are :
 (1) You would need precisely cut sections or views for example, front, side and maybe back. This could be a real pain to assemble.
(2) By its very nature, it is a time consuming process, as after you get the slices you need, you may have to employ image planes in the 3d modeling package of your choice.
(3) Thirdly, I feel that after all the pain of setting these reference images up, a modeller still finds that he or she tends to rely heavily on the perspective and camera views during modeling, that it would make more time saving sense if the skill of modeling without 'tracing' a blueprint were mastered.
3d modeling is essentially digital sculpting, I would expect that any good real life sculptor would flourish at this art. I would also be fair to say that generally, a good sculptor would make a good 2d artist.
Just to notify any readers of this blog, I will be breaking the contents down to regular small posts, rather than a long tutorial that comes once a week.
Friday 18 April 2008
3d images

I'm just testing the picture uploading facility here.I think that the ideal or near ideal size for an image for the purpose of doing a tutorial here would be 200 by 200 for what I plan. Anyway, Ive drawn a closed figure, and partially coloured it red. I'm not too sure about the amount of space allocated for images, Ill check that out and tailor the write ups accordingly.
I tried saving a complete web page in the mht format and pasting it here with all the images embedded, but it didn't seem to work. I intend to continue refining things as time goes on, but if I run out of storage space for my 3d files, I might have to take old stuff down to put the new in, you will see this pattern emerge if that problem arises. I'm also going to modify this little post later on this evening.
Wednesday 16 April 2008
Green Side Talk
I could not resist the urge to talk about the issue of global warming, and the challenges and threats future generations face concerning this issue, hey for anyone interested in my 3d posts, Ill have to apologise, as Ill be diverting from time to time, to talk about issues like these Ill always come back to the 3d theme, although I'm sure you'd agree with me, the environment is of number 1 importance.
I remember seeing a documentary on the telly some years ago, about an ancient city, once inhabited, which was completely submerged beneath the surface of the sea. I mean, just looking at the underwater ruins astonished me, the scuba divers were swimming between pillars etc with the fish and other sea life which had made the ruins their home. The sea level had risen over the centuries to claim the city. This rise in the seas level may have been due to factors not attributed to mans consumption of fossil fuels, after all, in the history of the world, the discovery of fossil fuels, and industrialisation are relatively recent events.
Having said this, Id say 10 years ago I was not thinking about issues like this, then gradually I became aware that there seemed to be a growing sense of impending doom, from the constant media coverage of the problems. Any time you turned on the telly, it was mentioned. A lot of people do not worry as they reason that {" hey, by the time the world gets messed up to the stage where all the major cities in the world become engulfed by the sea, Id be long gone, so why worry?"}...but some people will always think like that, because that's the nature of the human mind. It is impossible for everyone to think the same, what we should hope for is that the majority would be able to take steps to reduce global emissions, by cutting their individual carbon footprints, and that should be enough to make a change.
A question I asked myself the other day was: If everyone in on the planet complied, both governments and individuals, would it be enough to make a change?. The answer in plain terms is simple : Yes. The next question was : would this change ever be enough? My answer was I was not sure. You see, I say this because the more you think about it, the more you realise that the existence of the planet earth as we know it today is the most amazing and mind boggling balancing act of the forces of nature we are aware of. If that balance , that equilibrium is upset, changes would take place, and the world will readjust. The readjustments could take place over centuries or Millennia, we are just along for a ride.
It is going to take a colossal effort to get the majority of people thinking in a green way, I can only suggest that it has to start with teaching the children. I did say earlier in the blog that I started driving a car not too long ago, and immediately felt guilty, what did I do to reduce the guilt, and the emissions :
(1) Cut down on and eventually stop using the car for short trips that were unnecessary, eg any round trip of between 1.5 to 2.0 miles is short in my books.
(2) Bought a bicycle and taught myself how to ride it. This I use for trips that are too long to walk, but still too short to employ the car on, any round trip of between 2.0 to 8.0 miles falls in this group. I'm probably the first guy in the world who learnt how to ride a bicycle after an automobile.
(3) I embarked on a self designed fitness program to increase my endurance levels, improve my cardiovascular fitness and heighten the quality and efficiency of my bodies ability to utilise oxygen. Hey let me cut out the fancy talk and make it simple. I started jogging.
The connection between exercise, and your carbon footprint is simple, the fitter you are, the more capable you become to handle tasks that you otherwise would have relied on the car for, like just popping round to the corner shop to but groceries or so.
(4) It took a long time to get the kids to realise that they should switch off the tap between brushing their teeth, but we're getting there.
(5) For every household, making use of the recycling facilities requires a big turn around in long term habits, and fixed lifestyles, but it can be fun if done so in an organised fashion. In our area people use local authority freely distributed recycling bags to separate recyclable waste into different categories for easy recycling. Its funny, the odd things that can touch a persons feelings. I do remember, when those bags were first introduced, some households regarded them as freebie bin liners, and started throwing away their normal household trash in them. In a strange way that did upset me.
Okay readers now that Ive expressed myself with a few of my online rantings, lets get back to talking 3d eh?
Monday 14 April 2008
Workflows
Ill just spend some time talking about the concept of a workflow from my perspective in the 3d design industry. In your quest to become a well rounded 3d artist, or game model creator, you no doubt must have encountered the term. You would have read tutorial after tutorial accessed and downloaded from various sites. Basically, a workflow is the path of actions or steps usually involving the combination of one or more software, that a creator would implement in order to arrive at the stage of product completion.
What we are aiming at as 3d artists, is to achieve the perfect workflow. Believe it in this industry, time is money, and as far as time is concerned, it is an extremely time consuming process of churning out 3d work. I'm going to approach this post assuming you are a new artist, who has been trying his or her hand at various 3d software packages, working from home. Even if you are not in this category, and are already an established person working for a 3d games company, you would both agree that the hours do fly on the most basic of projects.So what is the perfect workflow, you may ask, and Ill tell you now, it doesn't yet exist, in theory, as long as software developers are constantly releasing new software that surpasses current ones, but because you may need a proper answer, Ill say the perfect workflow is the fastest, and most stress free one you can put together at the time in question, with the fewest amount of software, to reach your goal.
Tips for increasing speed of work are
(1) Invest time in learning about your chosen software: Many people tend to purchase or download 3d software, spend very little time reading the manuals, and just jump straight in and start to model. The approach may be that the user wants to learn a little bit at a time, on an ongoing basis, that is good, but what is better is a solid amount of time invested on learning what your software can and can not do.
Once you have this rough idea of the programs capabilities, you would know which other programs, free or commercial that you would need to speed things up.
(2) In any software bought, always learn the keyboard shortcuts needed to perform a given action. Keyboard shortcuts literally cut the production time down on a long term basis.
(3) Always plan before any project just what you want to create, and outline the steps you are going to take. Stick to this general pattern on projects of a similar nature, do not deviate, as your knowledge of the software's used increases, small modifications would be made naturally without even thinking about it.
(4) I know in this blog, Ive mentioned a few free software, but the truth is you only really get a full set of professional tools when you buy a commercial package like Softimage xsi, Maya, 3d Studio Max, or Rhino. These are robust programs, you can use free software, but you would have to pick carefully to ensure that the tools presented work in conjunction with each other.
Try to compact together the little features that each free program has to offer, eg you have 4 packages A, B, C, and D.
Package A can model and unwrap UVs.
Package B can unwrap UVs and paint them. The UV tools are not as good as A's
Package C can model only, but is better at it than A
Package D can paint but not as good as B, but it has the best rendering tools of the lot
Your workflow should be (1) Make the model in C (2) Import it into A where its unwrapped (3) transfer the unwrapped model into B for painting, and finally (4) transfer your completed work into package D, where you can make use of the rendering tools to print screenshots of your work at its best.
Now of course this looks like a very tortuous and convoluted path to take all for the sake of producing a bit of 3d art, this doesn't by all means implies that free programs are not good, theres a whole different type of thinking process, and a world of effort that went into planning the release of these open source items that you've just got to admire and respect. The closest to a complete free 3d package is the almighty Blender, which I have downloaded many times. It has become better with time.
Ill stop here now, as I have a few other online commitments to attend to, and erh.. those tutorials I promised
Tuesday 8 April 2008
Some tools
Now you may have heard a lot of 3d writers and established artists recommending a certain 3d software over another. As a person starting out in the field newly, it can be a baffling area. I think the best package to use is the one you are most comfortable with, however this does not necessarily mean that you are doing yourself justice by sticking to this one package that you've mastered over the months and years.
The range of tools a particular software has in its arsenal is very important in ensuring you are arriving at your destination ie (completed model) in the most stress free path possible, hence a period of blood and sweat in climbing that learning curve is a priceless investment that will help you on the long run.
There are a lot of free software available that can get you up and running in 3d, an example of a good free, open source 2d editing program is the gimp, a complete 3d modeling and animating software is Blender, another modeling software is Wings 3d.
A very good and affordable high end program is Softimage xsi foundation. The tools are second to none and you can achieve most things with what it has to offer. This is the software I currently use, but because I understand that a lot of struggling artists out there may not be able to afford even the lowest prices, all free future tutorials I plan to post on this blog would be written in a user friendly fashion, so that whichever software you intend to use, be it free or commercial, you would be able to apply the lessons learnt.
Ill stop here for now and get to work on getting some free tutorials done.
Sunday 6 April 2008
2D versus 3D
Now, in my last small post, I talked about the concept of learning 3d modeling. Some of the important skills that a person needs in order to get to the top of the game can be summed up as:
(1) Good spatial orientation skills
(2) Rich and diverse imagination
(3) Good 2 dimensional drawing skills
In addition to the above, you would definitely need the following
(a) A powerful computer with a decent graphics card, adequate amounts of memory, storage, a good processor,and a problem free operating system.
(b) The necessary software required to remain in contention in this ever increasingly competitive domain.
I will elaborate step by step
GOOD SPATIAL ORIENTATION
This is the ability to appreciate the space around us, the relationship between our bodies and the distance and placements of objects around us. In certain types of brain disorders and injuries, this ability may become compromised, but hey guys, I'm not trying to scare you by talking about neurological disorders and their implications, I'm sure I could write a 100 page project on the topic if I wanted to, but that would be side tracking. Just to make sure we're all safe do this simple test : Touch the tip of your nose with your eyes open....most people would be able to do this but not all. Now repeat the test but this time with your eyes closed.Again most can do this, but if you had difficulty doing it with your eyes open, and this difficulty became worse with the eyes closed, then there could be a problem. Run to your doctor now
In 3d modeling you are shaping a 3d universe that exists only on your computer screen. Your ability to navigate the real world effectively would reflect on the quality of work you produce on that screen.
RICH AND DIVERSE IMAGINATION
There are no limitation as to the objects you can create in 3d, apart of course to the offensive which I would not recommend. Your imagination becomes the fuel that triggers your fingers into action when creating those 3d world and characters that exist within your minds eye. Lets just say you decided to model a machine gun for a war game or something. Obviously, the polygon count would restrict you in the amount of detail you an and can not put on that model.....(.thats another discussion entirely by the way). Now a standard riffle like an AK-47 would have to look like the real-life article, but lets say that in your game, or video short film clip, the soldiers mess was raided by a group of aggressive aliens from some distant or alternate universe, all armed to the teeth ( I'm assuming they have teeth)....how would your minds eye model the weapons they wield? The answer is there are no real rules to how complex their weapons can look. Within the boundaries of your polygon count, and the other tricks to get more detail in, you can usually allow your imagination to run amok.
GOOD 2D DRAWING SKILLS
I never went to art class during my school years. I was well known for liking subjects like maths, physics, chemistry and biology. Yes I reckon I was in the nerd category. I had a little secret though, which would stay with me, linger on,and eventually shape the person I am today, and that secret,...(wait for it world) was I loved reading comics, and I found out at an early age that I had a gift of being able to recreate ( with a fair amount of accuracy) the characters I saw, on a piece of paper.I was so confident that I was able to sit for a secondary school art examination in both drawing and painting ( and pass) without ever attending a single lesson. One thing I had always admired about good 2d artists was their relative ease of representing a 3d object on a 2d medium. In other words, the way they manipulated perspective. Generally objects which are further away would appear smaller than those nearby. In a close up shot of a character on screen, you may be able to see a tall building in its entirety, in the background.
Also if the comic artist drew a person being punched with the punchers fist closest to the camera, then that fist would dominate the scene. I really should illustrate these basic concepts with some drawings. I promise to do that in later posts.The next and possibly the greatest skill of a 2d artist and painter is the ability to represent light, where its coming from and where its going. The use of highlights and shadow in a picture. This may seem basic, but its what could differentiate a good picture from a not so good one.
2d drawing skills are a must have, to separate a fantastic modeler from an ordinary one, but a learner or inexperienced modeler can overcome this to an extent depending on the type of software you use, its inbuilt renderer, and certain tricks you an employ to get the highlights you need on your final model.
In 3d rendered images, there has to be a light source to render the image this light source can be used to your advantage in creating useful textures.I will stop this post here because Ive run out time for now, the next time, Ill be elaborating on the types of software out there, both free and commercial which can be used. I will focus on free and value for money software that you can use to create your models.
Friday 4 April 2008
Blog Outlines
Right what do I have to say today? Lets talk 3d. Ive been keen on how 3d models and characters are made for computer games, and have been studying the trade for a long time. I think being a good 2d artist is a bonus, but I wouldn't say personally that you have to be a master at this to be a fantastic game artist, I say this because I know some people who are not fantastic paper and pencil artists, but when you give them a piece of clay to sculpt, you'd be amazed with what they can produce. I think 3d art has a lot to do with spatial orientation, the way our brains perceive and judge space and distance.On my blog, I want you to follow me in my learning journey to master this skill. I plan to track my journey from the perspective of a person new to the medium of computer graphics.
Thursday 3 April 2008
Intrests
Just want to state some of my intrests here. Im keen on 3d art, computer games, game programming, virtual reality, space exploration, the ever baffling nature of the universe, human psychology, medicine, and green house issues. Any material on these subjects interests me. I personally learnt how to drive a car not that many years ago, after many years of walking, and taking different forms of public transport, because of incerasing demands of family life. As soon as I experienced the joy and new found freedom of driving a car , there was a growing sense of guilt. A realisation of the fact that when you drive, you are contributing to the ever growing problem about global warming. I will outline the measures I took to combat this in a later post.
Wednesday 2 April 2008
Hello everyone
Hello everyone, hey Ive just created my first ever blog. Im in. Been hearing a lot about the phenomenom of lately, and have been curious, but its been a bit slow embracing the new concept. I used to think that just owning a pc and being on the internet was enough, but things do seem to have changed quite a bit over the last couple of years.
Anyway, I do hope in the future what I have to say would enrichen any readers lives or at least make a positive difference. Im just typing away to test the system, and I will return shortly.As you can see, my caption is 2worlds, I use this because apart from marveling about life, and our current world, I also am facinated with cyberspace.
Anyway, I do hope in the future what I have to say would enrichen any readers lives or at least make a positive difference. Im just typing away to test the system, and I will return shortly.As you can see, my caption is 2worlds, I use this because apart from marveling about life, and our current world, I also am facinated with cyberspace.
Subscribe to:
Posts (Atom)