

[fig 3]
Now look at the image above, it shows the modeling process in action. What is happening is I'm trying to shape the character from an existing template of a basic man which comes with the software application I use. Ive removed the head from the scene by selecting extracting, and hiding it. The right arm of the character in the above figure, is already in progress. It is a mechanical, metallic looking contraption, with a pincer-like distal extremity. [fig 4]
[fig 5]
In the picture above, the polygons around the waist line were selected, and extruded. Since the belt of the character is a prominent aspect of his look, that had to be modelled hat least half of the way, rather than to rely solely on texture painting. The polygons were also scaled down in the vertical direction. (The red areas show the selected polygons)
The reason why I scaled them down like this is that if the character is looked at head on, you would loose the sense of depth for the belt if all the polygons were the same height.
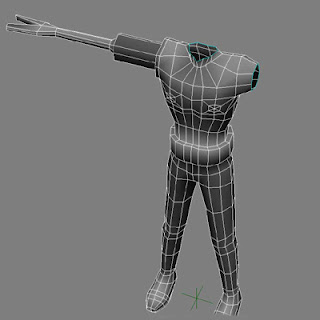

[fig 6]
The shaping of our character continues. Here, the left humanoid arm was selected and deleted. We are designing an alien entity here, actually not just an alien entity, but a mean alien entity. The left 'arm' has a laser firing weapon of some sort. Its a cylindrical structure with a fair amount of surface detail. Again, we would not be modelling every aspect of the mechanical arm, just the gross details. The texturing would be used to fill in everything.
I'm going to step things up with this tutorial and post at a faster rate until its finished so that we can move on to the next modeling project. As the time goes by, the tutorials will be written with more detail.
No comments:
Post a Comment